Keep the folders you use again and again in one place on your computer, and link them into each project. Claude can still read them, and you stop copying the same files into every folder.
Most of us start by copying the same reference material into every new folder: the sample report, the instructions, the scorecard, the brand guide. It works, but it doesn't last.
Say you open one folder per person you're researching, and each one gets its own copy of the sample report and your instruction files. After ten cases you have ten copies. Improve the instructions in one and the other nine are out of date, and your computer fills up with the same heavy files over and over.
A workspace fixes that. Your project folder stays exactly as it is, and the shared folder stays where it lives. VS Code shows both side by side in the Explorer and remembers the link in one small file. Change the shared folder once and every workspace that links to it sees the change.
Good candidates for a shared folder: your design system, a sample report you want Claude to copy the style of, scorecards, CLAUDE.md templates and skills. Anything you'd otherwise paste into every project.
Step 02
Drag the shared folder into VS Code
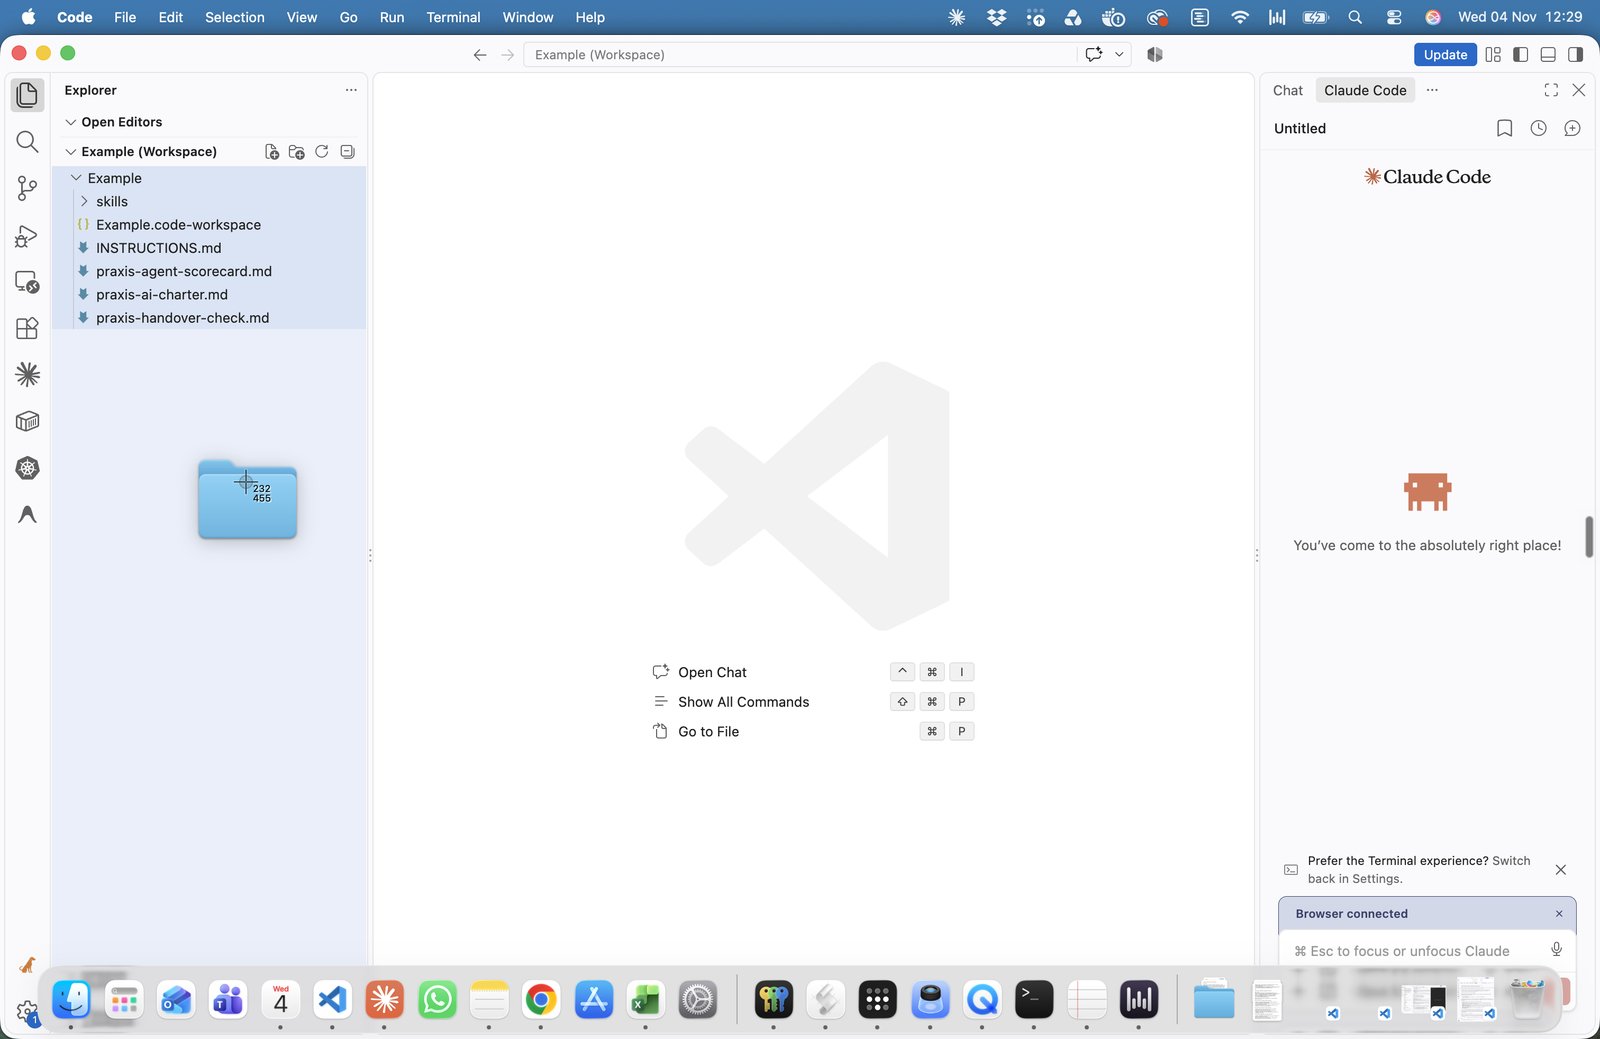
Open your project folder in VS Code as usual. Then find the shared folder in Finder (or File Explorer on Windows) and drag it onto the Explorer panel on the left.
123Fig. 1 Dragging a folder from Finder onto the Explorer.
1The workspace. Here it's called Example and holds one folder so far, Example, which lives on the Desktop.
2Example.code-workspace is the small file that remembers which folders belong to this workspace. You make it in step 5.
3The shared folder on its way in. Drop it anywhere on the Explorer panel.
Prefer menus? File, then Add Folder to Workspace… does the same thing and lets you pick the folder.
Step 03
Choose Add Folder to Workspace
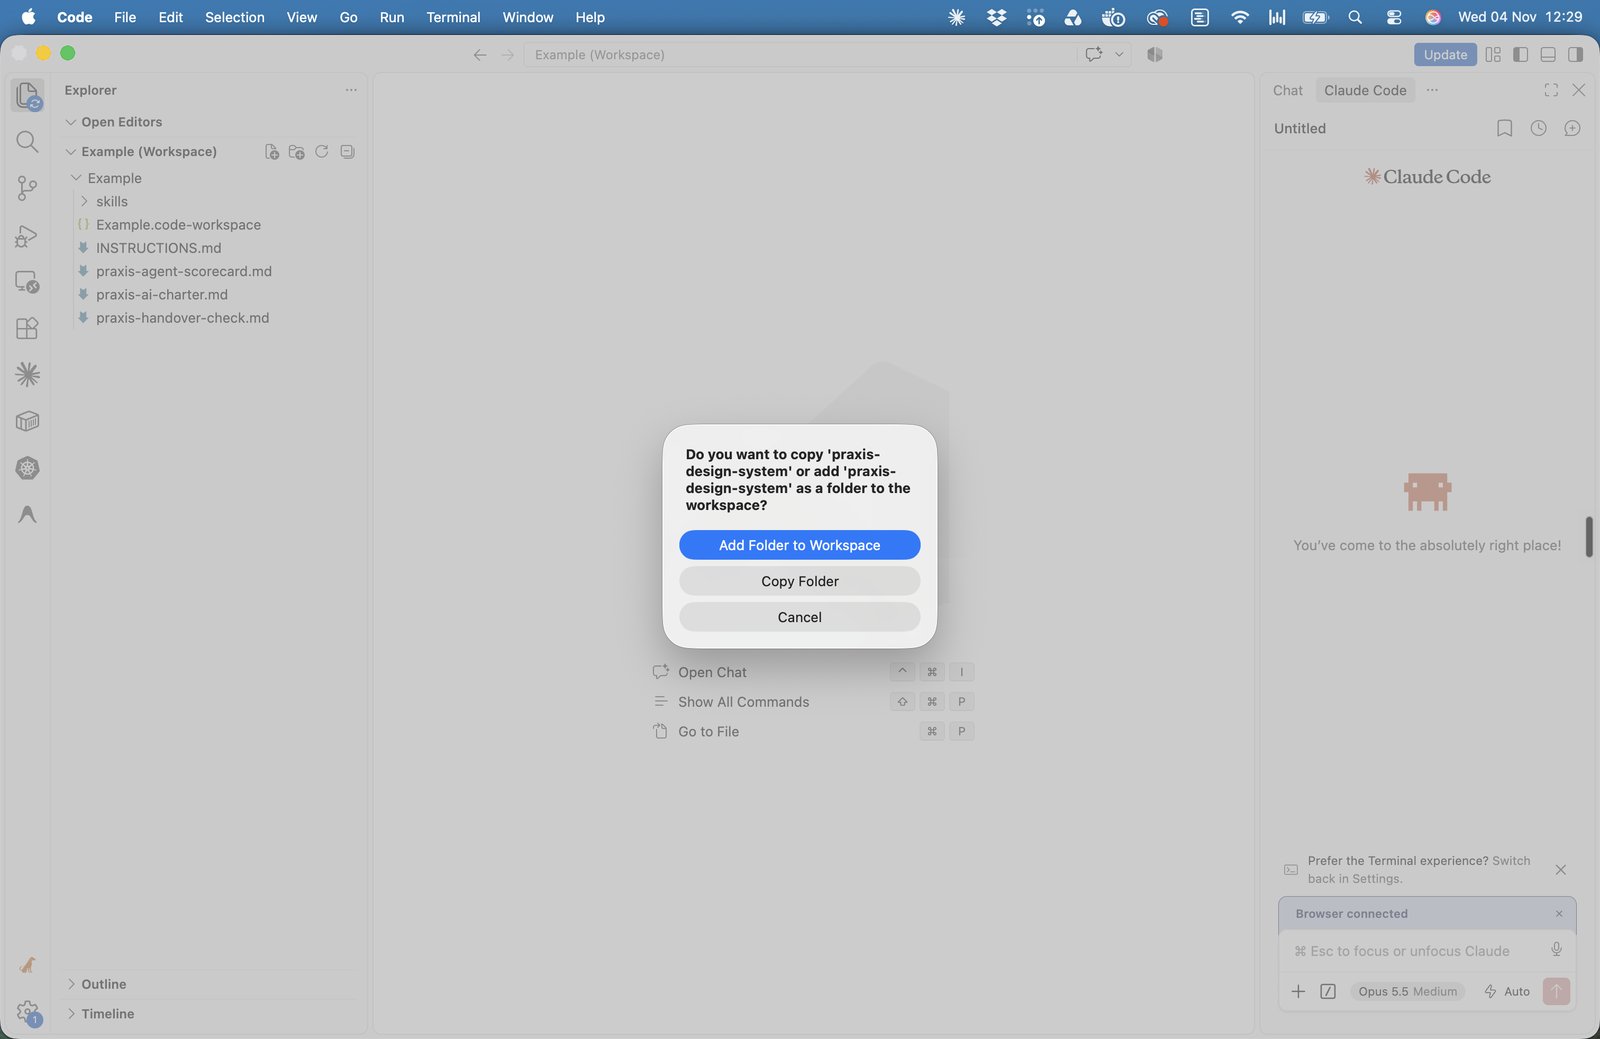
When you drop the folder, VS Code asks what you want to do with it. This is the one choice that matters.
1Add Folder to Workspace. Pick this one. VS Code links the folder and leaves it where it is.
2Copy Folder makes another copy inside your project, which is exactly what we're trying to stop.
VS Code may ask whether you trust the folder. Say yes only if it's your own material. If the shared folder sits inside the parent folder you trusted in the VS Code setup guide, it won't ask.
Step 04
Check it's linked and not copied
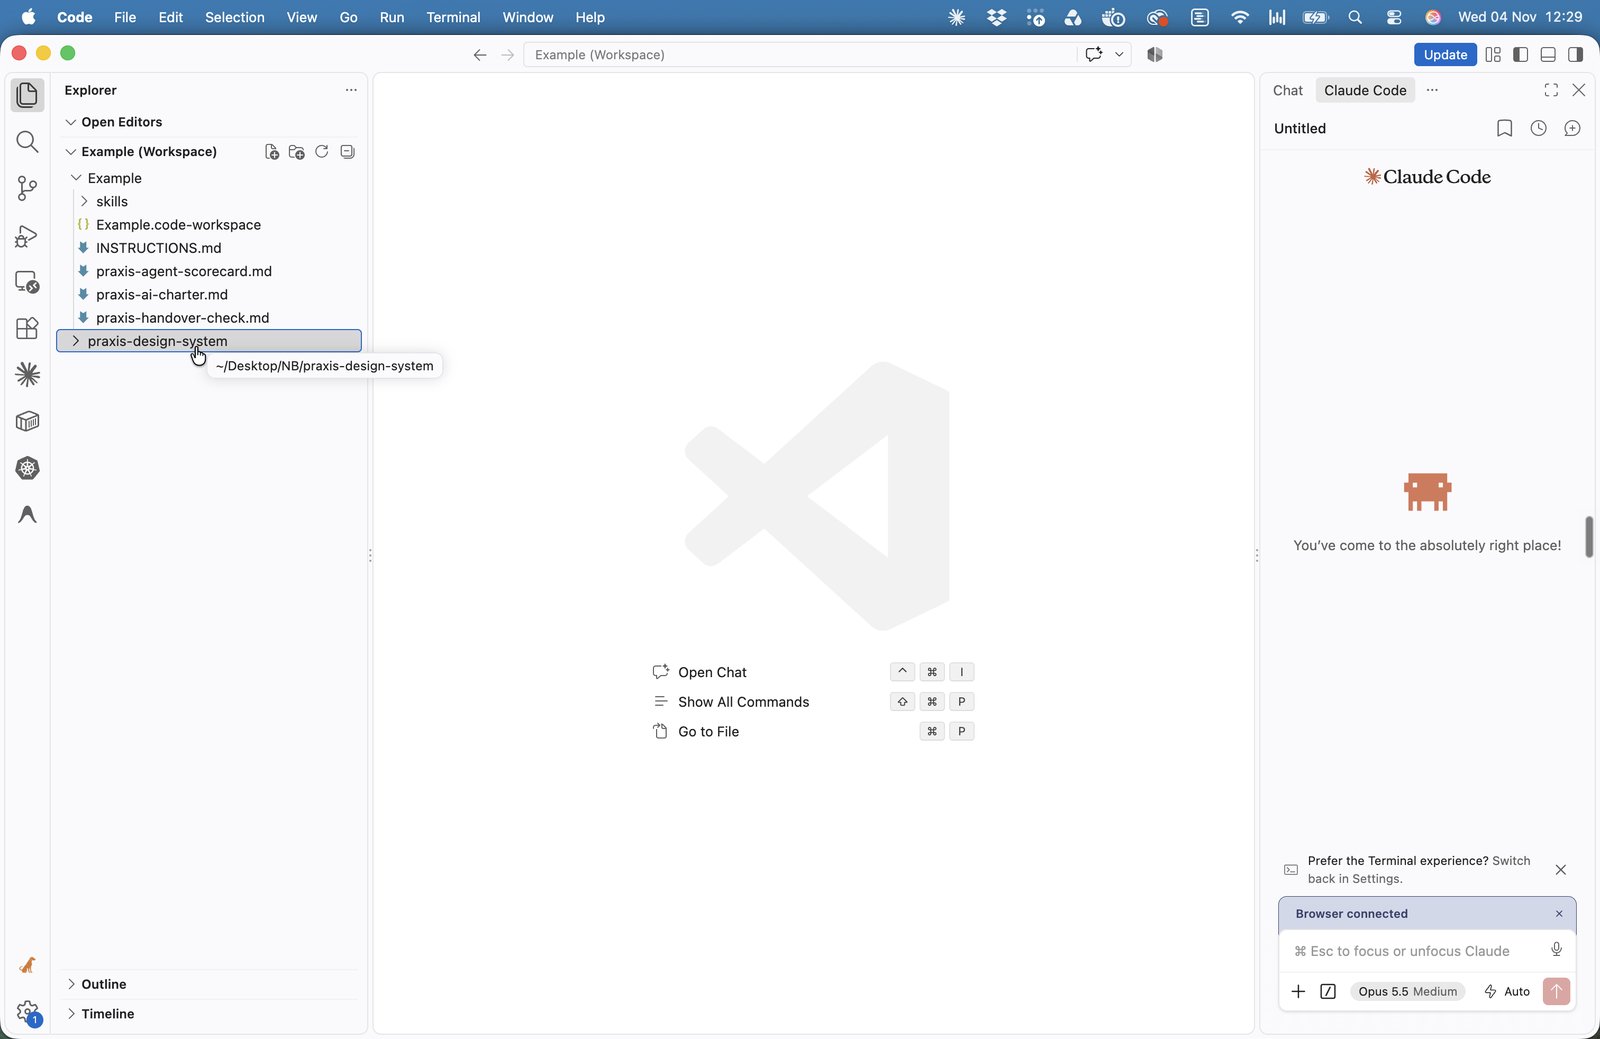
The shared folder now shows up as a second folder at the top level of the Explorer, next to your project folder.
2The shared folder, praxis-design-system, at the same level.
3Hover over it to see where it really lives, here ~/Desktop/NB/praxis-design-system. Open the Example folder in Finder and you won't find it there.
Add as many shared folders as you like. To take one out, right-click it and choose Remove Folder from Workspace. That only removes the link: the folder and its files stay where they are.
Step 05
Save the workspace
Until you save it, the workspace is called Untitled and VS Code forgets the links when you close the window.
Close the window, or choose File, then Save Workspace As…
When VS Code asks whether to save your workspace configuration, click Save.
Save it inside your project folder and give it the project's name. You get one extra file, such as Example.code-workspace (Fig. 1, box 2). It only holds the list of linked folders, nothing else.
Next time, open that file instead of the folder: double-click it, or use File, then Open Workspace from File… All the linked folders come back with it.
For a new project, open its folder, drag in the same shared folders and save a new workspace. One shared folder can sit in as many workspaces as you like.
Step 06
Point Claude at the shared folder
Claude works the same way it did before. To make sure it uses the shared material, tell it where to look.
Right-click the shared folder, or a file inside it, and choose Copy Path.
Paste the path into your message in the Claude Code panel, for example: Write the report in the style of the sample in followed by the path.
If Claude asks for permission to read the folder, allow it.
Keep the shared folder light. Claude reads text far better than PDFs. Convert the reference PDFs you use most into Markdown or text files once, and keep those in the shared folder. Every project that links to it gets the faster, more accurate version.
Reference
Quick reference
Action
Where
Link a folder
Drag it onto the Explorer and pick Add Folder to Workspace, or File, Add Folder to Workspace…
Save the workspace
File, Save Workspace As…
Open it again
Double-click the .code-workspace file, or File, Open Workspace from File…
Unlink a folder
Right-click it, Remove Folder from Workspace. Nothing is deleted.
No question when you drop the folder: you probably dropped it on the editor in the middle, which opens it instead. Drop it on the Explorer panel on the left.
You clicked Copy Folder by mistake: delete the copy inside your project folder and drag the original in again.
The linked folders are gone after a restart: you opened the project folder instead of the .code-workspace file. Open the file.
Agents missing and a Restricted Mode banner at the top: the shared folder isn't trusted. See step 4 of the VS Code setup guide.